Spring Batch Hello World Example 專案
本範例實作說明:
本篇主要使用 Spring Batch,做一個基本測試專案,
此Batch 為 讀取csv檔 轉換為 xml檔 的功能。
使用到 Spring Batch 的 ItemReader、ItemProcessor和ItemWriter 。
也將 Spring Batch job metadata 加入 ,但本例不說明(另文說明)。
一、範例開發準備工具
作業系統:Windows 7
開發工具:Eclipse Java EE IDE for Web Developers Juno Service Release2
JAVA JDK : JDK1.7.0_60
Database: Postgresql 9.3
其它相關:Maven 4.0
Springframework 4.1.3.RELEASE
Springframework batch 3.0.2.RELEASE
二、新增Maven範例專案
範例專案名稱:SpringBatchHelloWorldExample
圖1 開啟Eclipse -> File -> New -> Maven Project

圖2 選擇專案存放位置 use default Workspase location-> Next
選擇存放在預設的工作資料夾下(就是你開Eclipse時,選擇Workspase下)

圖3 使用 Maven 範本
本例選用:
Group id : org.apache.maven.archetypes
Artifact id : maven-archetype-quickstart
Version : 1.1
-> Next
註:
Group id為公司名稱 or 群組分類名稱
Artifact Id 為專案標識符,就是專案名稱

圖4 範例專案
Group id : SpringBatchHelloWorldExample
Artifact id : SpringBatchHelloWorldExample
Version : 0.0.1-SNAPSHOT
Package : com.levin
-> Finish
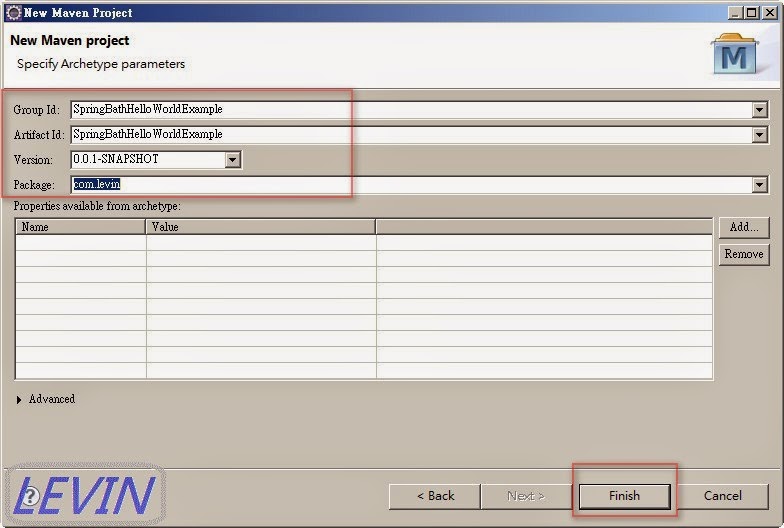
圖5 新增專案後,基本預設資料

二、使用相關jar檔
圖6 開啟 pom.xml

pom.xml內容:
<project xmlns="http://maven.apache.org/POM/4.0.0" xmlns:xsi="http://www.w3.org/2001/XMLSchema-instance"

 xsi:schemaLocation="http://maven.apache.org/POM/4.0.0 http://maven.apache.org/xsd/maven-4.0.0.xsd">

 <modelVersion>4.0.0</modelVersion>


 <groupId>SpringBathHelloWorldExample</groupId>

 <artifactId>SpringBathHelloWorldExample</artifactId>

 <version>0.0.1-SNAPSHOT</version>

 <packaging>jar</packaging>


 <name>SpringBathHelloWorldExample</name>

 <url>http://maven.apache.org</url>


 <!-- 1、設定 properties 參數資料 -->

 <properties>

  <project.build.sourceEncoding>UTF-8</project.build.sourceEncoding>

  <jdk.version>1.7</jdk.version>

  <spring.version>4.1.3.RELEASE</spring.version>

  <spring.batch.version>3.0.2.RELEASE</spring.batch.version>

  <junit.version>4.11</junit.version>

 </properties>

 <!-- 2、設定 dependencies -->

 <dependencies>


  <!-- Spring Core -->

  <dependency>

   <groupId>org.springframework</groupId>

   <artifactId>spring-core</artifactId>

   <version>${spring.version}</version>

  </dependency>


  <!-- Spring jdbc, for database -->

  <dependency>

   <groupId>org.springframework</groupId>

   <artifactId>spring-jdbc</artifactId>

   <version>${spring.version}</version>

  </dependency>


  <!-- Spring XML to/back object -->

  <dependency>

   <groupId>org.springframework</groupId>

   <artifactId>spring-oxm</artifactId>

   <version>${spring.version}</version>

  </dependency>


  <!-- postgresql database driver -->

  <dependency>

   <groupId>org.postgresql</groupId>

   <artifactId>postgresql</artifactId>

   <version>9.3-1100-jdbc41</version>

  </dependency>


  <!-- Spring Batch dependencies -->

  <dependency>

   <groupId>org.springframework.batch</groupId>

   <artifactId>spring-batch-core</artifactId>

   <version>${spring.batch.version}</version>

  </dependency>

  <dependency>

   <groupId>org.springframework.batch</groupId>

   <artifactId>spring-batch-infrastructure</artifactId>

   <version>${spring.batch.version}</version>

  </dependency>


  <!-- Spring Batch unit test -->

  <dependency>

   <groupId>org.springframework.batch</groupId>

   <artifactId>spring-batch-test</artifactId>

   <version>${spring.batch.version}</version>

  </dependency>


  <!-- Junit -->

  <dependency>

   <groupId>junit</groupId>

   <artifactId>junit</artifactId>

   <version>${junit.version}</version>

   <scope>test</scope>

  </dependency>


 </dependencies>

 <!-- 3.執行及建置 -->

 <build>

  <finalName>SpringBathHelloWorldExample</finalName>

  <plugins>

   <plugin>

    <groupId>org.apache.maven.plugins</groupId>

    <artifactId>maven-eclipse-plugin</artifactId>

    <version>2.9</version>

    <configuration>

     <downloadSources>true</downloadSources>

     <downloadJavadocs>false</downloadJavadocs>

    </configuration>

   </plugin>

   <plugin>

    <groupId>org.apache.maven.plugins</groupId>

    <artifactId>maven-compiler-plugin</artifactId>

    <version>3.2</version>

    <configuration>

     <source>${jdk.version}</source>

     <target>${jdk.version}</target>

    </configuration>

   </plugin>

  </plugins>

 </build>

</project>
三、相關resoures
建立resoures 路徑
src/main/resoures
建立設定檔存放路徑
src/main/resoures/config
建立資料庫資訊檔存放路徑
src/main/resoures/config/database
建立Spring batch 設定檔存放路徑
src/main/resoures/config/springbatch
建立匯入csv測試資料檔存放路徑
src/main/resoures/csv
圖7 建立相關 resoures

圖8 將 resoures 加入到 source folders on build path
在專案按右鍵 -> Properties

圖9 進入Properties介面 -> Java Build Path
-> Source -> Add Folder..
->進入 Source Folder Selection介面
-> 選擇 打勾 resoures
-> OK -> OK

四、建立資料庫資訊檔 database.xml
src/main/resoures/config/database/database.xml
database.xml內容:
  <beans xmlns="http://www.springframework.org/schema/beans"

   xmlns:jdbc="http://www.springframework.org/schema/jdbc" xmlns:xsi="http://www.w3.org/2001/XMLSchema-instance"

   xsi:schemaLocation="http://www.springframework.org/schema/beans

    http://www.springframework.org/schema/beans/spring-beans-4.0.xsd

    http://www.springframework.org/schema/jdbc

    http://www.springframework.org/schema/jdbc/spring-jdbc-3.2.xsd">


   <!-- database 連線設定 -->

   <bean id="dataSource"

    class="org.springframework.jdbc.datasource.DriverManagerDataSource">

    <property name="driverClassName" value="org.postgresql.Driver" />

    <property name="url" value="jdbc:postgresql://127.0.0.1:5433/springTest" />

    <property name="username" value="postgres" />

    <property name="password" value="postgres" />

   </bean>


   <bean id="transactionManager"

    class="org.springframework.batch.support.transaction.ResourcelessTransactionManager" />


   <jdbc:initialize-database data-source="dataSource">

    <jdbc:script

     location="org/springframework/batch/core/schema-drop-postgresql.sql" />

    <jdbc:script location="org/springframework/batch/core/schema-postgresql.sql" />

   </jdbc:initialize-database>


  </beans>
五、建立Spring batch 設定檔存放路徑
src/main/resoures/config/springbatch/jobs-context.xml
src/main/resoures/config/springbatch/spring-batch.xml
jobs-context.xml內容:
<beans xmlns="http://www.springframework.org/schema/beans"

 xmlns:xsi="http://www.w3.org/2001/XMLSchema-instance"

 xsi:schemaLocation="

  http://www.springframework.org/schema/beans

  http://www.springframework.org/schema/beans/spring-beans-4.0.xsd">


 <!--設定 JOB 及 database 的關係-->

 <bean id="jobRepository"

  class="org.springframework.batch.core.repository.support.JobRepositoryFactoryBean">

  <property name="dataSource" ref="dataSource" />

  <property name="transactionManager" ref="transactionManager" />

  <property name="databaseType" value="POSTGRES" />

 </bean>


 <bean id="jobLauncher"

  class="org.springframework.batch.core.launch.support.SimpleJobLauncher">

  <property name="jobRepository" ref="jobRepository" />

 </bean>


</beans>
spring-batch.xml內容:
<beans xmlns="http://www.springframework.org/schema/beans"

 xmlns:batch="http://www.springframework.org/schema/batch" xmlns:xsi="http://www.w3.org/2001/XMLSchema-instance"

 xsi:schemaLocation="http://www.springframework.org/schema/batch

  http://www.springframework.org/schema/batch/spring-batch-3.0.xsd

  http://www.springframework.org/schema/beans

  http://www.springframework.org/schema/beans/spring-beans-4.0.xsd

 ">


 <import resource="jobs-context.xml" />

 <import resource="../database/database.xml" />


 <!-- 設定model -->

 <bean id="report" class="com.levin.model.Report" scope="prototype" />

 <!-- 設定item Processor -->

 <bean id="itemProcessor" class="com.levin.ReportItemProcessor" />


 <!-- -->

 <batch:job id="helloWorldJob">

  <batch:step id="step1">

   <batch:tasklet>

    <batch:chunk reader="csvFileItemReader" writer="xmlItemWriter"

     processor="itemProcessor" commit-interval="10">

    </batch:chunk>

   </batch:tasklet>

  </batch:step>

 </batch:job>


 <bean id="csvFileItemReader" class="org.springframework.batch.item.file.FlatFileItemReader">

  <!-- 取得csv資料 -->

  <property name="resource" value="classpath:csv/reportData.csv" />


  <property name="lineMapper">

   <bean class="org.springframework.batch.item.file.mapping.DefaultLineMapper">

    <property name="lineTokenizer">

     <bean

      class="org.springframework.batch.item.file.transform.DelimitedLineTokenizer">

      <!-- 設定欄位名稱 -->

      <property name="names" value="id,sales,qty,staffName,date" />

     </bean>

    </property>

    <property name="fieldSetMapper">

     <!-- 設定檔案讀取程式 -->

     <bean class="com.levin.ReportFieldSetMapper" />

    </property>

   </bean>

  </property>


 </bean>


 <!-- 設定寫出資料程式 -->

 <bean id="xmlItemWriter" class="org.springframework.batch.item.xml.StaxEventItemWriter">

  <!-- 寫出資料存放位置 -->

  <property name="resource" value="file:xml/outputs/report.xml" />

  <property name="marshaller" ref="reportMarshaller" />

  <property name="rootTagName" value="report" />

 </bean>

 <!-- 設定寫出xml 的 model -->

 <bean id="reportMarshaller" class="org.springframework.oxm.jaxb.Jaxb2Marshaller">

  <property name="classesToBeBound">

   <list>

    <value>com.levin.model.Report</value>

   </list>

  </property>

 </bean>


</beans>
六、建立匯入csv測試資料檔
資料存放位置: src/main/resoures/csv/reportData.csv
1001,"213,12",980,levin , 2013/1/02
1002,"220,20",1080,tom 1 , 2013/2/4
1003,"252,19",2200,tom 2 , 2013/11/10
1003,"248,19",1500,tom 3 , 2013/10/20
1003,"552,18",2800,tom 4 , 2013/6/15
1003,"323,78",1900,tom 5 , 2013/5/12
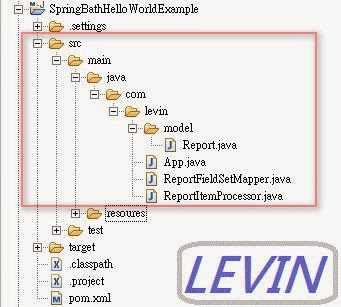
七、相關java程式
圖10 相關java程式
八、建立model Report.java
檔案路徑: src/main/java/com/levin/model/Report.java
package com.levin.model;


import java.math.BigDecimal;

import java.util.Date;


import javax.xml.bind.annotation.XmlAttribute;

import javax.xml.bind.annotation.XmlElement;

import javax.xml.bind.annotation.XmlRootElement;

/**

 * 訂單報表

 */

@XmlRootElement(name = "record")

public class Report {


 /**

  * 編號

  */

 private int id;

 /**

  * 銷售

  */

 private BigDecimal sales;

 /**

  * 數量

  */

 private int qty;

 /**

  * 銷售人員名稱

  */

 private String staffName;

 /**

  * 日期

  */

 private Date date;


 @XmlAttribute(name = "id")

 public int getId() {

  return id;

 }


 public void setId(int id) {

  this.id = id;

 }


 @XmlElement(name = "sales")

 public BigDecimal getSales() {

  return sales;

 }


 public void setSales(BigDecimal sales) {

  this.sales = sales;

 }


 @XmlElement(name = "qty")

 public int getQty() {

  return qty;

 }


 public void setQty(int qty) {

  this.qty = qty;

 }


 @XmlElement(name = "staffName")

 public String getStaffName() {

  return staffName;

 }


 public void setStaffName(String staffName) {

  this.staffName = staffName;

 }


 public Date getDate() {

  return date;

 }


 public void setDate(Date date) {

  this.date = date;

 }


 @Override

 public String toString() {

  return "Report [id=" + id + ", sales=" + sales + ", qty=" + qty + ", staffName=" + staffName + "]";

 }


}
九、建立讀資料程式 ReportFieldSetMapper.java
檔案路徑: src/main/java/com/levin/ReportFieldSetMapper.java
package com.levin;


import java.text.ParseException;

import java.text.SimpleDateFormat;


import org.springframework.batch.item.file.mapping.FieldSetMapper;

import org.springframework.batch.item.file.transform.FieldSet;

import org.springframework.validation.BindException;


import com.levin.model.Report;


public class ReportFieldSetMapper implements FieldSetMapper {


 private SimpleDateFormat dateFormat = new SimpleDateFormat("yyyy/MM/dd");


 public Report mapFieldSet(FieldSet fieldSet) throws BindException {


  Report report = new Report();

  report.setId(fieldSet.readInt(0));

  report.setSales(fieldSet.readBigDecimal(1));

  report.setQty(fieldSet.readInt(2));

  report.setStaffName(fieldSet.readString(3));


  //fieldSet.readDate(4); //預設的 format yyyy-MM-dd

  String date = fieldSet.readString(4);

  try {

   report.setDate(dateFormat.parse(date));

  } catch (ParseException e) {

   e.printStackTrace();

  }


  return report;


 }


}
十、建立讀取資料項目程式 ReportItemProcessor.java
檔案路徑: src/main/java/com/levin/ReportItemProcessor.java
package com.levin;


import org.springframework.batch.item.ItemProcessor;


import com.levin.model.Report;


public class ReportItemProcessor implements ItemProcessor {


 public Report process(Report item) throws Exception {


  System.out.println("執行中..." + item);

  return item;

 }


}
十一、建立執行測試程式 App.java
檔案路徑: src/main/java/com/levin/App.java
package com.levin;


import org.springframework.batch.core.Job;

import org.springframework.batch.core.JobExecution;

import org.springframework.batch.core.JobParameters;

import org.springframework.batch.core.launch.JobLauncher;

import org.springframework.context.ApplicationContext;

import org.springframework.context.support.ClassPathXmlApplicationContext;


public class App {

 public static void main(String[] args) {


  String[] springConfig  =

   {

    "config/springbatch/spring-batch.xml"

   };


  ApplicationContext context =

    new ClassPathXmlApplicationContext(springConfig);


  JobLauncher jobLauncher = (JobLauncher) context.getBean("jobLauncher");

  Job job = (Job) context.getBean("helloWorldJob");


  try {


   JobExecution execution = jobLauncher.run(job, new JobParameters());

   System.out.println("執行狀態 : " + execution.getStatus());


  } catch (Exception e) {

   e.printStackTrace();

  }


  System.out.println("執行程式結束。");


 }

}
十二、專案建立完成
圖11 專案建立完成,程式及資料清單

SpringBathHelloWorldExample/
src/main/java/com/levin/model/Report.java
src/main/java/com/levin/App.java
src/main/java/com/levin/ReportFieldSetMapper.java
src/main/java/com/levin/ReportItemProcessor.java
src/main/resoures/config/database/database.xml
src/main/resoures/config/springbatch/jobs-context.xml
src/main/resoures/config/springbatch/spring-batch.xml
src/main/resoures/csv/reportData.csv
4個java檔程式
3個xml檔
1個csv資料檔
請核對是否與本例範例一樣。
如不一樣,請往文章尋找。
十三、測試 - 確認JDK版本
圖12 確認JDK版本。
在專案按右鍵 -> Properties ->進入Properties介面
-> Java Build Path -> Libraries

十四、測試 - 執行
圖13 在專案按右鍵 -> Run As -> Java Application
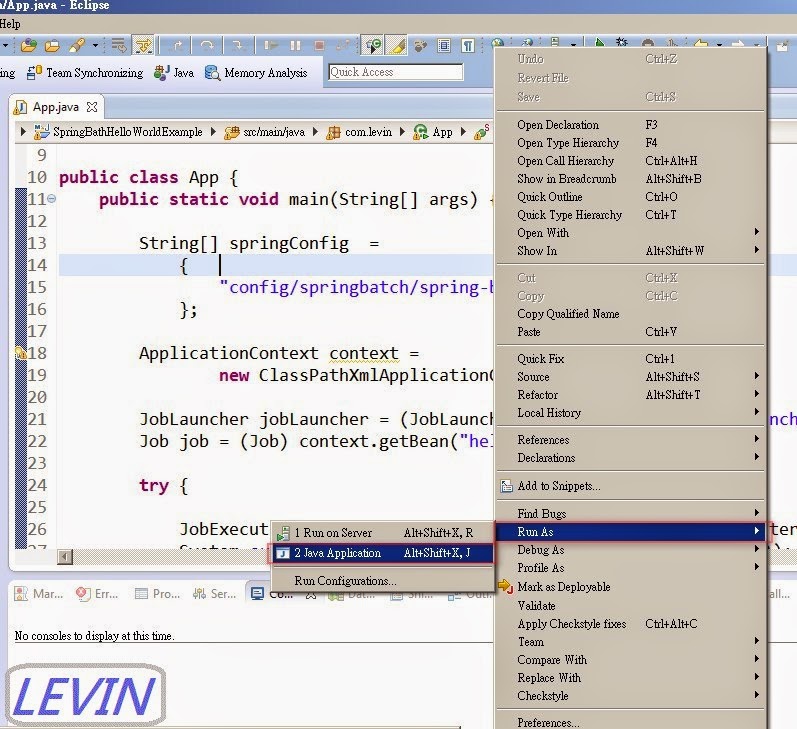
圖14 執行結果

圖15 查看匯出的xml檔

十五、參考:
圖16 - Spring Batch 首頁

圖17 - Spring batch docs 說明文件

十六、本站參考:
Struts + Spring + Hibernate 目錄
其它文章

 留言列表
留言列表

