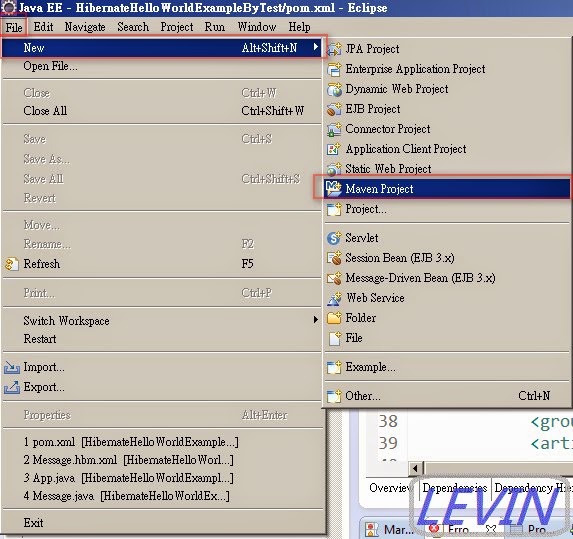
Hibernate Hello World Example 專案 之 XML Mapping 本範例實作說明: 本篇主要使用 Hibernate,做一個基本測試專案, 此 Hibernate 使用 XML Mapping。 本範例會使用到 PostgreSQL 及 log4j 一、範例開發準備工具 作業系統: Windows 7 開發工具: Eclipse Java EE IDE for Web Developers Juno Service Release2 JAVA JDK : JDK1.7.0_60 資料庫 : PostgreSQL 9.3 其它相關: Maven 4.0 Hibernate Version 4.3.7.Final 二、新增Maven範例專案 範例專案名稱:HibernateHelloWorldExample 圖1 開啟Eclipse -> File -> New -> Maven Project (如果沒看到Maven Project ,Eclipse -> File -> New -> Other.. ->)
圖1-1 按下Other 開始的介面
圖2 選擇專案存放位置 use default Workspase location-> Next 選擇存放在預設的工作資料夾下(就是你開Eclipse時,選擇Workspase下)
圖3 使用 Maven 範本 本例選用: Group id : org.apache.maven.archetypes Artifact id : maven-archetype-quickstart Version : RELEASE -> Next 註: Group id為公司名稱 or 群組分類名稱 Artifact Id 為專案標識符,就是專案名稱
圖4 範例專案 Group id : HibernateHelloWorldExample Artifact id : HibernateHelloWorldExample Version : 0.0.1-SNAPSHOT Package : com.levin -> Finish
圖5 新增專案後,基本預設資料
三、使用相關jar檔
  <!-- Hibernate framework -->
   <dependency>
    <groupId>org.hibernate</groupId>
    <artifactId>hibernate-core</artifactId>
    <version>${hibernate.version}</version>
   </dependency>
來源網此:Mvnrepository >> org.hibernate 圖6 開啟 pom.xml
 <project xmlns="http://maven.apache.org/POM/4.0.0" xmlns:xsi="http://www.w3.org/2001/XMLSchema-instance"
 xsi:schemaLocation="http://maven.apache.org/POM/4.0.0 http://maven.apache.org/xsd/maven-4.0.0.xsd">
 <modelVersion>4.0.0</modelVersion>

 <groupId>HibernateHelloWorldExample</groupId>
 <artifactId>HibernateHelloWorldExample</artifactId>
 <version>0.0.1-SNAPSHOT</version>
 <packaging>jar</packaging>

 <name>HibernateHelloWorldExample</name>
 <url>http://maven.apache.org</url>

 <properties>
  <project.build.sourceEncoding>UTF-8</project.build.sourceEncoding>
  <jdk.version>1.7</jdk.version>
  <hibernate.version>4.3.7.Final</hibernate.version>
  <junit.version>4.11</junit.version>
 </properties>

 <dependencies>

  <!-- Hibernate framework -->
  <dependency>
   <groupId>org.hibernate</groupId>
   <artifactId>hibernate-core</artifactId>
   <version>${hibernate.version}</version>
  </dependency>

  <!-- postgresql database driver -->
  <dependency>
   <groupId>org.postgresql</groupId>
   <artifactId>postgresql</artifactId>
   <version>9.3-1100-jdbc41</version>
  </dependency>

  <!-- Junit -->
  <dependency>
   <groupId>junit</groupId>
   <artifactId>junit</artifactId>
   <version>${junit.version}</version>
   <scope>test</scope>
  </dependency>
 </dependencies>

 <build>
  <finalName>HibernateHelloWorldExample</finalName>
  <plugins>
   <plugin>
    <groupId>org.apache.maven.plugins</groupId>
    <artifactId>maven-eclipse-plugin</artifactId>
    <version>2.9</version>
    <configuration>
     <downloadSources>true</downloadSources>
     <downloadJavadocs>false</downloadJavadocs>
    </configuration>
   </plugin>
   <plugin>
    <groupId>org.apache.maven.plugins</groupId>
    <artifactId>maven-compiler-plugin</artifactId>
    <version>3.0</version>
    <configuration>
     <source>${jdk.version}</source>
     <target>${jdk.version}</target>
    </configuration>
   </plugin>
  </plugins>
 </build>
</project>
四、相關resources 建立resources 路徑 src/main/resources 圖7 建立相關 resources 在專案按右鍵 ->New -> Folder
圖8 將 resources 加入到 source folders on build path 在專案按右鍵 -> Properties
圖9 進入Properties介面 -> Java Build Path -> Source -> Add Folder..
圖10 進入 Source Folder Selection介面 -> 選擇 打勾 resources -> OK -> OK
圖11 在resources下 新增三個檔案 hibernate.cfg.xml message.hbm.xml log4j.properties
五、建立 hibernate.cfg.xml 路徑: src/main/resources 檔名:hibernate.cfg.xml 說明:資料庫設定檔,相關hibernate 主要設定,資料庫連線資訊等。 本例資料庫名稱:hibernateTest
 <?xml version="1.0" encoding="utf-8"?>
<!DOCTYPE hibernate-configuration PUBLIC
"-//Hibernate/Hibernate Configuration DTD 3.0//EN"
"http://hibernate.sourceforge.net/hibernate-configuration-3.0.dtd">
<hibernate-configuration>
 <session-factory>
  <!--使用資料庫 相關設定 -->
  <property name="hibernate.dialect">org.hibernate.dialect.PostgreSQLDialect</property>
  <property name="hibernate.connection.driver_class">org.postgresql.Driver</property>
  <!--連線資料 (url)、帳號(username)及密碼(password) -->
  <property name="hibernate.connection.url">jdbc:postgresql://127.0.0.1:5433/hibernateTest</property>
  <property name="hibernate.connection.username">postgres</property>
  <property name="hibernate.connection.password">postgres</property>
  <!-- hibernate 相關效能設定 -->
  <property name="hibernate.bytecode.use_reflection_optimizer">false</property>
  <property name="connection_pool_size">1</property>

  <!-- validate | update | create | create-drop 如果沒要用 set value="none". -->
  <!--
   validate 程式執行驗證資料對應表相關資料。
   update   如果table已存在,就更新,不存在則新增
   create   每次執行就自動刪除所有對應的table,再新增所有對應的table
   create-drop 新增所有對應的table , 程式關閉前刪除所有對應的table
  -->
  <property name="hbm2ddl.auto">create</property>
  <!-- 是否顯示所有執行的sql -->
  <property name="show_sql">true</property>
  <!-- 對應資料表 -->
  <mapping resource="message.hbm.xml"></mapping>
 </session-factory>
</hibernate-configuration>
六、建立 message.hbm.xml 路徑: src/main/resources 檔名:message.hbm.xml 說明:table 對應檔,設定table 名稱及欄位設定等。
 <?xml version="1.0"?>
<!DOCTYPE hibernate-mapping PUBLIC "-//Hibernate/Hibernate Mapping DTD 3.0//EN"
"http://hibernate.sourceforge.net/hibernate-mapping-3.0.dtd">

<hibernate-mapping>
    <class name="com.levin.model.Message" table="message">
        <id name="messageId" type="java.lang.Integer">
            <column name="MESSAGE_ID" />
            <generator class="identity" />
        </id>
        <property name="messageCode" type="string">
            <column name="MESSAGE_CODE" length="10" not-null="true" unique="true" />
        </property>
        <property name="messageName" type="string">
            <column name="MESSAGE_NAME" length="20" not-null="true" unique="true" />
        </property>
    </class>
</hibernate-mapping>
七、建立 log4j.properties 路徑: src/main/resources 檔名:log4j.properties 說明:log4j 設定檔 ,記錄資訊用的,可不建此檔。
# Root logger option
log4j.rootLogger=INFO, stdout

# Direct log messages to stdout
log4j.appender.stdout=org.apache.log4j.ConsoleAppender
log4j.appender.stdout.Target=System.out
log4j.appender.stdout.layout=org.apache.log4j.PatternLayout
log4j.appender.stdout.layout.ConversionPattern=%d{ABSOLUTE} %5p %c{1}:%L - %m%n


# Hibernate logging options (INFO only shows startup messages)
log4j.logger.org.hibernate=INFO

# Log JDBC bind parameter runtime arguments
log4j.logger.org.hibernate.type=trace
八、建立 Java程式 Message.java HibernateUtil.java HibernateMain.java 圖12
九、建立 Message.java 路徑: src/main/java/com/levin/model 檔名:Message.java 說明:資料模型,裝table資料及存取資料。
 package com.levin.model;

/**
 * Model class for Message.java
 */
public class Message implements java.io.Serializable {

 private static final long serialVersionUID = 1L;

 private Integer messageId;
 private String messageCode;
 private String messageName;

 public Message() {
 }

 public Message(String messageCode, String messageName) {
  this.messageCode = messageCode;
  this.messageName = messageName;
 }

 public Integer getMessageId() {
  return messageId;
 }

 public void setMessageId(Integer messageId) {
  this.messageId = messageId;
 }

 public String getMessageCode() {
  return messageCode;
 }

 public void setMessageCode(String messageCode) {
  this.messageCode = messageCode;
 }

 public String getMessageName() {
  return messageName;
 }

 public void setMessageName(String messageName) {
  this.messageName = messageName;
 }
}
十、建立 HibernateUtil.java 路徑: src/main/java/com/levin 檔名:HibernateUtil.java 說明:Hibernate 建立資料庫連線
 package com.levin;

import org.hibernate.SessionFactory;
import org.hibernate.cfg.Configuration;

public class HibernateUtil {

 private static final SessionFactory sessionFactory = buildSessionFactory();

 private static SessionFactory buildSessionFactory() {
  try {
   // Create the SessionFactory from hibernate.cfg.xml
   return new Configuration().configure().buildSessionFactory();
  } catch (Throwable ex) {
   // Make sure you log the exception, as it might be swallowed
   System.err.println("Initial SessionFactory creation failed." + ex);
   throw new ExceptionInInitializerError(ex);
  }
 }

 public static SessionFactory getSessionFactory() {
  return sessionFactory;
 }

 public static void shutdown() {
  // Close caches and connection pools
  getSessionFactory().close();
 }

}
十一、建立 HibernateMain.java 路徑: src/main/java/com/levin 檔名:HibernateMain.java 說明:主程式,執行Hibernate程式。
 package com.levin;

import org.hibernate.Session;

import com.levin.model.Message;

/**
 * Hibernate Hello world!
 *
 */
public class HibernateMain {

 public static void main(String[] args) {
  System.out.println("Maven + Hibernate + PostgreSQL Hello World! ");
  Session session = HibernateUtil.getSessionFactory().openSession();

  session.beginTransaction();
  Message message = new Message();

  message.setMessageCode("1546");
  message.setMessageName("Hello World");

  session.save(message);
  session.getTransaction().commit();
 }

}
十二、專案所有資料檔 共新增6個檔 一個.propertie,二個.xml,三個.java log4j.properties hibernate.cfg.xml message.hbm.xml Message.java HibernateMain.java HibernateUtil.java 圖13 如有少圖中紅框的檔,請往上找詢。 另它為專案自動生成檔。
十三、測試 圖14 開啟HibernateMain.java -> 此程式中按右鍵 -> Run As -> 點選 Java Application
圖15 執行開始
圖16 執行結束
圖17 檢查資料 進入PostgreSQL的pqAdminIII工具, 登入後查看資料庫裡是否有新增message table
十五、下一篇 Hibernate Hello World Example 專案 之 Annotation Mapping 十六、相關參考 Struts + Spring + Hibernate 目錄